Saturday, April 28, 2012

How to Make a Button Tab Valence

The work on the study continues, although slightly hindered by various acts of stupidity on my part.  For example, I planned the whole project around this fabric, 
which I chose because it had two of my main colors in it:  the yellow of the walls, and the purple of my recliner.  Once I had fallen in love with the fabric ("Wind Symphony" by RJR Fabrics), I took it to the paint store, where I matched the teal and the brick red to use as highlight colors.  A week or two later, back to the fabric store I went to buy two yards for... oh, I don't know yet, whatever.  But there wasn't any more, and they told me it had been discontinued and they couldn't get it.  Great!  Now I've planned my whole room around a fabric that doesn't exist.

Thankfully, I found it on eBay and ordered two yards.  That is, I thought I did.  When it arrived and there was only one yard, I got all huffy and self-righteous with the seller, who kindly pointed out that the details on the eBay listing specified that it is sold by the half yard.  So "two" means one yard.  No wonder it was only half the cost it had been at my local fabric store!

The one yard was enough to cover the two chair seats and get a head start on the valence while I waited for delivery of the other yard I needed.  For indeed, I had decided that a valence above the window would look great made of the same fabric.

Twenty years ago I splurged on a pair of really nice (expensive) lace curtains, for which I found no suitable place in the house where we lived for the last 14 years.  They were perfect for my study window — not to cover it, but just to hang at the sides and look pretty.
But they needed a valence, don't you think?  (Sorry about the poor photo quality; my camera and I are not friends these days.)  We splurged on cellular shades that open from either the top or the bottom; here it is all the way up.  Just a little hard and straight-sided for my taste, even with the lace panels.

The valence I envisioned would hang from tabs secured by buttons, so I looked around on line and found this site, which gave excellent directions.  If you are serious about making a tabbed valence or curtain secured by buttons, you might prefer to go there rather than wading through this chronology.

My first yard yielded enough fabric, after the chair seats were done, to make 18 tabs about 4" wide and 10" long, which I guessed would be plenty.  This whole thing was less "planned" than "done by the seat of the pants," but eventually it all worked out.

When the additional fabric arrived, I made sure it was straight by using the old "pull out a thread" trick that I learned in 8th grade sewing class.

It's very tedious, but this way I could be sure that I was cutting exactly on the straight of the fabric.  Then I cut it in half lengthwise and seamed the sides together, attempting to match the pattern in the seam by folding/overlapping it the way you would when hanging wallpaper.  It was a crap shoot that I'd get it right, and I promised myself that if it wasn't exact, I would not fiddle with it, but would just accept it and go on.
Okay, so not perfect, but not too bad...

This gave me a piece 18" high and 88" long, for a valence over a window that was about 65" wide.  I turned in the side seams, using this magical stuff instead of struggling with my fossil of a sewing machine trying to make a hem stitch.  You just iron the fabric down with this stuff in between.
Whoever invented this should be sainted.

Then I folded each tab long ways and stitched it, right sides together, across one end and along one side.  I used this technique (scroll about half way down the page), which is apparently an old quilter's trick called "strip-piecing," in which you just place one piece next to the one you're working on and keep stitching, rather than that tedious reverse stitching to anchor all the stitches in place at both ends on each separate piece.  These were going to end up inside a seam anyway, so they wouldn't really need to be anchored.
They looked like this when I was finished, and all I had to do was cut them carefully apart.  The tedious part was turning each one right side out, after clipping the corners so they would lie flat, and pressing them well.  Now each tab had one seamed end, one folded side, one seamed side, and one raw end.

Figuring that the finished height of the valence would go from just above the window frame to just below the open (that is, up at the top of the window) shade, I did the math, allowing for the seam allowance at the top (more about that soon) and a 2.5" hem at the bottom.  I ripped off the excess fabric to use as a facing at the top, and hemmed the bottom.  Oops, I forgot to turn under the 1/2" allowance for the hem, so it's got a raw edge.
Oh well, no one is going to see it (except the thousands of people who read this blog).

Then came the clever part, thanks to the Internet and this site.  After searching the whole house to find a 7' piece of floor that wasn't covered in dog hair, I laid out the valence right side up and spaced the tabs on it with the raw edges aligned so that the tabs were facing down.  They ended up being about 4"apart, center to center, using 15 tabs.  (Okay, so I have three left over... who knows but I might need them some time?)
It's rather difficult to see, so I put a shell on one tab to make it visible.


Then I laid the facing wrong side up on top of the valence and the tabs, and pinned through all layers.

I stitched the whole length of the thing through the facing, tabs, and valence, ending up with something that looked like this with the facing going up, seam at the bottom.
(The facing already had side seams on it, since I had done them before tearing it off.)

When you turn it over to press it, it looks like this, with the raw ends of the tabs secured between the facing and the valence, finished tabs headed in the right direction (that would be up).  Remembering the seam allowance this time, I ironed the facing down with that magical Heat Bond so it looked finished.

Then came the fun part, buttons to secure it.  I had decided to use a variety of similar-sized buttons in red, purple and green, and had bought a jar of assorted red ones and a jar of assorted  purple ones at my local fabric store.  I had the green ones already in my button box.  (That's one advantage of being an old geezer — you have a really great button collection!  And now I have a lifetime supply of red and purple buttons as well.)
These are the ones I chose.  They look a little more different in real life, though the green ones are the same.

First folding each tab exactly in half, so they would all be the same finished length, I pinned each one down.  Then followed an evening of carefully sewing on fifteen buttons in random order, and voila!
Done!  I was a little surprised that it wasn't longer, but I guess I lost a lot of that 88" length with the side hems and the fudging I had to do in order to not match the pattern in the center seam.  Nevertheless, it has a little extra give to it so it's soft and pretty-looking.


And on to the next project, which will be the basket liners.  Stay tuned!

Tuesday, April 03, 2012

The Chair Project

We suddenly find ourselves, in retirement, living on a somewhat austere budget.  Gone are the days of eating out whenever we pleased (a rarity anyway, as we eat so well at home) or buying a book we want to read (thank goodness for the Multnomah County Library!)

So when it comes to making our sweet house into a home, I'm looking for ways to save money, reuse or repurpose what we have, etc.  I've become a devotee of Craigslist and some DIY websites (especially this one) which are teaching me even more than I learned at my father's knee or my husband's side over the past 60 years or so.

I'll be blogging about renovating my home study from time to time until it's done.  This is reminiscent of my daughter's question to me when she was about twelve:  "Mom, when they were inventing cottage cheese, how did they know when they were done?"

I'm not sure how I'll know when I'm done with this, but I'll probably figure it out.  Anyway, today's installment is about refinishing chairs.

I found these chairs for $5 each at a restaurant supply store (advertised on Craigslist).  They are very sturdy and well made, but were dirty and the finish was flaking off.  The faux leather seats were dreadful, and both of them were webbed with dust, cobwebs and leaves; they probably had been stored in a barn somewhere.


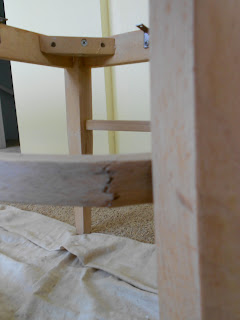
Had we looked more carefully while we were in the dingy attic of Rose's Restaurant Supply, we would have noticed this crack in a rung of one of them.  However, Duane says the wood is a laminate and since this crack is only in the outer layer, it probably won't make much difference, so I didn't do anything about it.


After removing the seats, it was easy to sand using a little electric mouse sander with 100 gauge sandpaper for the flat surfaces, and sanding the curved surfaces by hand.  Because the finish was already flaking off, this went very quickly.  The sanding was done outdoors, of course, on the one day in weeks when the sun was out.  I brought them upstairs to my study (note new paint on the walls) where they'd stay dry in the Portland weather, and the floor was covered with a drop cloth anyway from the wall-painting project.

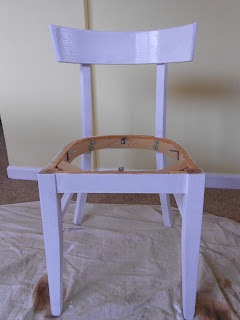
Here's one after being painted with one coat of oil-based primer.  (I learned from the kids at Young House Love that you can paint latex paint over oil-based primer, and it's better to use oil-base primer because it seals much better than latex.)  My mistake was not painting the horizontal surface on the seat, which I thought would be covered by the cushion.  But unpainted bits showed around the edges, so I had to wait to install the seats and go back to paint the part that shows as natural wood above.


I just love me a nice fresh can  of paint, don't you?  This is Benjamin Moore's "Intercoastal Green" in the Aura semi-gloss base.  It's a low VOC (volatile organic compound) paint which is really nice to work with and good for the environment.


You do know the ol' nail trick, don't you?  Before you start painting, pound a few nail holes in the lip of the can so that paint will run back down into the can instead of all over the outside.  Not only does it save paint, but you want to keep the outside of the can as clean as possible so you can identify the paint later.  But just to be sure, you'll want to identify the paint by writing on the cover of the can, which of course you will keep pristine.  And for heaven's sake, don't write "Judy's study," because the next owner of the house won't know what room that is.  Instead write its geographic location, like "upstairs north bedroom."


Once the chairs had two coats of color on them and were left to dry for several days (yes, that's longer than they say you'll need, but why take a chance that you'll dent or mar that fresh paint by touching it too soon?) I got going on the seats, which turned out to be amazingly easy peasy.

I pried off the old nasty faux red leather, which was attached with about a zillion staples.  My plan had been to replace the foam under it, but that foam was very tightly glued to the chair bottoms and it looked okay -- not ratty or coming apart, and pretty darn clean -- so I just decided to put the new fabric over it.


I put the seat foam side down on the wrong side of the fabric and traced around it.  Then I made another line 2" outside of the tracing, and cut the fabric along that line.  Here's the seat face down on the wrong side of the fabric.  (I've already cut out one piece of fabric to the right; that's the dining room table showing through.)

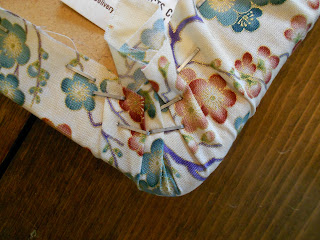
Then using your trusty antique staple gun (which takes two arthritic hands to squeeze all the way down), you start stapling.  I put three staples on the straight edge of the bottom first, then turned it around and put a few at the top, stretching the fabric as tightly as I could.  Just work your way back and forth pulling it tight and stapling one side and then the other.  Oh, and don't rest the heel of the staple gun on the table unless you want a lot of little dents in the table like we have now.  A doubled-over towel under the whole thing would have prevented that.


The only tricky places were the corners, where I was trying to keep the fabric perfectly smooth on top with no visible pleats or folds.  I pulled it up in the center of the corner first, then pulled up one side and then the other, easing the fabric with each pull.  Staples are cheap, so I used a lot!

There we go, all done!


And here's the final product, ready to be sat on!  

Just to help you remember where I started, here's the "before" picture again.  I'm so glad that in this big project there is finally an "after" to show you!


TA DAA!!!

Berry's Mom Gets Ambitious

With this blog post I'm expanding my blog horizons beyond knitting to home improvement.  There's absolutely nothing authoritative about my talents in the field of home improvement, but I thought it would be fun to chronicle some of my projects as I work my way up the learning curve.

We bought this 1920-ish bungalow after it had been flipped by a real estate investor.  He did a very good job of making it appealing and attractive.  It was freshly painted inside and out, all new windows, refinished hardwood floors and new carpeting... nothing not to like, right?  But I've been feeling as though we live in a nice rental, and I've been itching to make it reflect us and our tastes

Unfortunately I don't have photos of the whole house in its "before" state, because we've done quite a bit to it already, mostly along the lines of adding cupboards and shelves, changing the colors in the bathroom (our Feng Shui consultant said we should have red at the back of the house), and a LOT of work already in the yard.  Most of this work was done by Duane, and I hope he will blog about it some more.  But since this is my blog, I'll write about my projects, starting with my study.

When we moved in and just stuck the furniture where it would be out of the way, my study looked like this.  Fresh paint, odd light fixture, pocket door into the bathroom with its unspeakably ghastly round mirror over the sink.

That mirror has been replaced, though we haven't done much else to the bathroom.  My attention has been focused on making my study into A Room of My Own -- that is, when it hasn't been focused on a million other things for the past six months.


Here's the view looking in the other direction.  Sweet eyebrow window facing west (full glare in the afternoon, but charming) and strange little indentations about 30 inches from the outside wall.  This is the office furniture that I brought from Carlisle, where my home study was a lot bigger and I was doing a lot more work, thus needing a big desk.  It's way too big for this room, but it was functional for a while.

Here's another view of the nook, actually taken when the DIY project had begun by removing two of the little triangular shelves.  Because of the roof angle,  it wouldn't make sense to extend the top shelf , but Duane made the two lower shelves go all the way across the space.  These will be used for something to do with knitting, I suspect.


And of course -- ta daa! -- the room has been painted!  I found that blue color terribly cold over the winter, especially since this room isn't tied into the central heating system of the rest of the house, and is heated just with a built-in electric wall heater.  My two primary goals with this room were to furnish it with appropriately-scaled furniture, and to warm it up and make it feel more feminine.  Okay, three goals.  The color I chose is Benjamin Moore's Haystack from my favorite paint store.  I am going to become best friends with Dimitrios The Paint Store Guy, I can tell you!  this is an eggshell finish in a low VOC paint.

Actually I didn't do all that good a job. Duane has been the very model of restraint in not telling me how to do it better, since I insisted that I want to do this job all by myself.  (I know I sound like a five-year old.)  so there are a few splotches of yellow paint on the white ceiling, and the brush marks where I cut in along the edges show a bit.  But all in all, it's not bad, and the flaws will disappear (she says hopefully) when the furniture and art is in place.

Stay tuned for further chapters in this gripping saga!